What’s in a name?

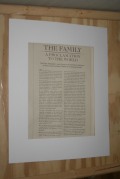
Quite a while ago I was watching Shark Tank, or it could possibly have been Dragon’s Den (the Canadian version). There was a company that did Alphabet Photography. You know me… I am too cheap to buy something like that. But of course I thought to myself surely I could do that on my own… So I set out to do it. First I started looking for things that matched the letters in our last name. I took photos when I saw things. (For instance two saw horses together made an ‘M’, some trees formed other letters, iron work made an ‘E’, etc). Walmart had their free shipping on prints again so I got 8 5×7 prints shipped to my home for $4 something. I got 8 instead of 7 because one of my letters was questionable. I had two options for my V, one was landscaped which I wanted the other was portrait. Luckily my first choice just fit with the matting.

Next I needed something to put the photos in. I wanted a collage frame, but there aren’t many 7 picture in a row collage frames out there. So I did the next best thing. I went to the dollar store and bought 7 $1 frames. I got 5×7 frames that were matted down to a 4×6.

IMG_7754

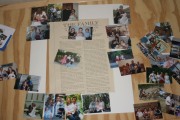
I wanted a collage frame. I didn’t want to just hang up individual pictures. So I arranged the pictures, measured for accuracy, and then epoxied them together.

IMG_7757

I added my photos. It was flimsy and heavy so I added a wood slat on the back to stabilize it. I don’t plan on changing the pictures so I just glued the slat down. Then I hung it up. I totally love it, my engineer said it has nice pictures but he wouldn’t know it said our last name if I didn’t tell him… I know what it says and I love it.  Total project cost… less than $13.

IMG_7768

The Family A Proclamation to the World

I first saw this idea at my neighbors house… Her mom took her proofs from her wedding photos and put them around a framed copy of The Family: A Proclamation to the World. At this time I was married and had 2 kids. I didn’t really want to use only wedding photos, but I also didn’t want to exclude my future children by using current family pictures. So I literally have been waiting for almost 6 years to do this project. We are pretty sure 5 kids is our magic number, as we have taken medical steps to make it so. That being the case I finally decided that it would be alright to do this project.

For years I had a blank mat around my Proclamation.

IMG_7611

Blank Mat

I wanted to show the progression of my family thus far. So I put everything from wedding pictures to current family pictures into a folder on the computer. Now for the research. I searched photo printing sites for wallets size photos. I was looking at $13-$20 range for my prints, which was more than I wanted to pay. Besides I didn’t need multiple copies of these photos.  Most are already in scrap books. I took my problem to my personal engineer, my husband. He had the suggestion putting 2 pictures on 1 print. This can be done with a number of programs, but he did it in paint. I had the pictures printed at walmart.com. They were running a sale on free shipping. So my prints for this project cost $1.40ish… basically a 90% savings. Thank goodness for my personal engineer.

2 Pictures 1 Print

2 Pictures 1 Print

Next I cut apart the photos. I started placing photos around to get a feel for placement.

IMG_7612

Testing Placement

IMG_7613

Tentative Placement

Next trim the photos to fit on the mat.

IMG_7615

Trim to fit mat.

Use adhesive of your choice to hold pictures in place. I just used a scrapbook adhesive because it was easy to use and acid free. Start on a corner to keep it square.

IMG_7614

Start on a corner to keep it square.

Once all pictures are glued down trim any that went past the mat. This can be done with an exacto knife which will give a nice edge. I just used scissors so my edge is a little rougher.

IMG_7616

Trim Overhang.

Center the proclamation in the mat. Then glue down.

IMG_7617

Center it.

When we made two pictures into one we did not make sure that each was exactly 1/2 of a 4×6 print. So some of our pictures were larger and some were smaller. Which is fine, but it left me with some white space. So I added an embellishment. It says our last name on the top and established with our wedding anniversary on the bottom.

IMG_7620

Embellishment

Then I put my masterpiece back in the frame. I can honestly say it isn’t perfect, but I love it! This will be treasured for years to come it was worth the six year wait.

IMG_7623

Our Family Proclamation

Canvas Print…. for less.

Recently my mother-in-law took a picture of our family…

Everyone was actually looking the right direction and smiling. Which is a pretty amazing feat for a family of 7.  I really wanted a canvas print, but alas we are on a budget. I normally get my prints and photo projects from artscow.com. I do this mainly because they have lots of free shipping or you get free items and just pay shipping.

Unfortunately they wanted $34.99 for a 20″ x 16″ stretched canvas, plus shipping ($24.99… yikes). That is considerably more than I was willing to spend.  Currently they have a special offers section. They had a 20″x16″ unstretched canvas for 17.99 w/free shipping. So I ordered my print with that. But lets face it an unstretched canvas doesn’t look too hot on the wall.

So I did what any girl in my situation would do. I sent my husband to the hardware store and had him buy a 1″x2″ (they come in an 8′ length). Then we made a frame and stretched the canvas and stapled it to our frame. Our 1″x2″ cost around $1.50. So I got my custom canvas on my wall for under $20…. now that fits in my budget.

IMG_7648

Family Portrait on DIY Frame

IMG_7647

DIY frame for stretched canvas.

Old Pants Made New

As my children get older the hand-me-downs get fewer…..

Recently I was helping at at yard sale. As we were bagging up the leftover items I noticed there were a lot of women’s pajama pants. My oldest daughter is starting to move out of footed pajamas and needs more pajama options. I decided to put aside some of the cuter, but way too big for my daughter, pajama pants.

 I know this is not a new idea, but it is great for us.  The pants were just long enough, or is she just short enough, that there was enough fabric to make her 18″ doll Katy a matching pair… Some of the pants had enough fabric to make shirts as well…. but alas that is a project for another day. Next time I will take before during and after photos.

What once was big is now small!

What once was big is now small!

New pajamas for her and her doll!

This is what I did… I am not a master sewer, crafter, or the like. I am a dabbler that does things my own way usually without a pattern. I am not a perfectionist so my projects usually turn out a little less than perfect, but I like them and they are functional. If you think there is a better way to do this… By all means leave a comment. Who knows I might use your idea next time.

STEP 1

Find some too big pajama pants and wash them.

STEP 2

Try on. Pin equal amounts on each side to fit child’s waist. Pin desired length. Cut 1.5 inches past pin for length.

STEP 3

Serge down the sides of the pajama pants. Fold .75 inch twice on bottom and sew a hem. Cut Strings.

Enjoy your new pants.


Enter your email address to follow this blog and receive notifications of new posts by email.

Join 1 other subscriber